


How to pass the ICBC Motorcycle Road Test for Class 6 and Class 8N License.
Including Can Ams and other Three Wheelers.
Videos are at the bottom of the page.
The best advice we can give you on passing the ICBC Motorcycle Road Test is, riding. Be comfortable with the motorcycle you’re on and spend a lot of time riding. Some people can pass the test in as little as 10 hours of riding, others may take 100 hours of riding. We all learn differently.
Don’t be in a rush to get this test done and over with. The ICBC final road test is a concert performance and you are the star. ICBC will have no problem failing you within the first five minutes of your road test if you ride poorly.
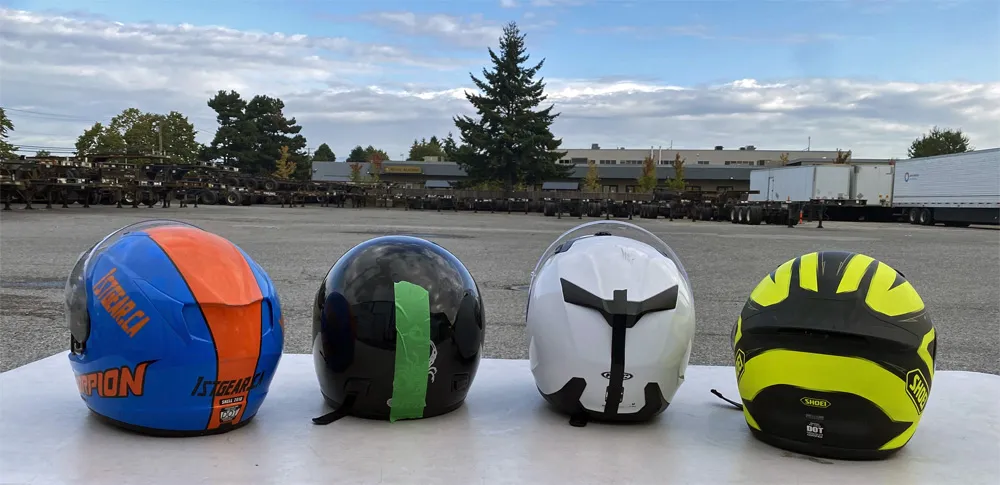
If you have a colorful helmet. GOOD!. If not… It is useful to have a vertical line of bright tape on the back of your helmet to make it easy for the examiner to see your shoulder checks. You’ll have to exaggerate your head movements on the test. Mirror checks do not count.
Is your motorcycle road test ready? Ensure your signals work (custom/integrated signals are ok as long as they are very visible). Low and high beam headlight. Tail light works with front brake level and rear brake pedal, independently. The horn works. If your exhaust is loud, that is OK.
The examiner will give you a hi viz vest to wear. Inside the vest is a radio. You receive instructions from a speaker located inside the vest on your left shoulder. It will be loud enough for you to hear. As long as your exhaust pipes are not too loud.
How to pass the road test
1.
ICBC will give you instructions. DO NOT act on them immediately. Think about it and proceed when it is safe to do so. ICBC expects you to follow all the rules and laws, not follow their instructions immediately as they say them. If you miss a turn. Do not worry, it is ok. Do not rush and fail yourself. If you are stuck in a right turn lane, you must turn right.
It is the examiners job to keep up to you. Do not slow down and allow the examiner to catch up to you. They will mark this against you since you are going slow.
2.
A motorcycle speedometer will not be equal with the examiners car following you. Check your speedometer with a GPS app (Waze is good for this).
Road Sign 30km/h – You go 30km/h
Road Sign 50 km/h – You go 53 km/h to 55 km/h
Road Sign 60 km/h – You go 64 km/h to 66 km/h
Road Sign 70 km/h – You go 75 km/h to 77 km/h
If it is raining, you still must maintain the speed limit. Going under the limit is not acceptable on the road test.
3.
Do not ride too close to the yellow center line or the dotted white line. Ride ONE meter away from it. ICBC does not want you riding too close to oncoming traffic or riding too close to other traffic.
4.
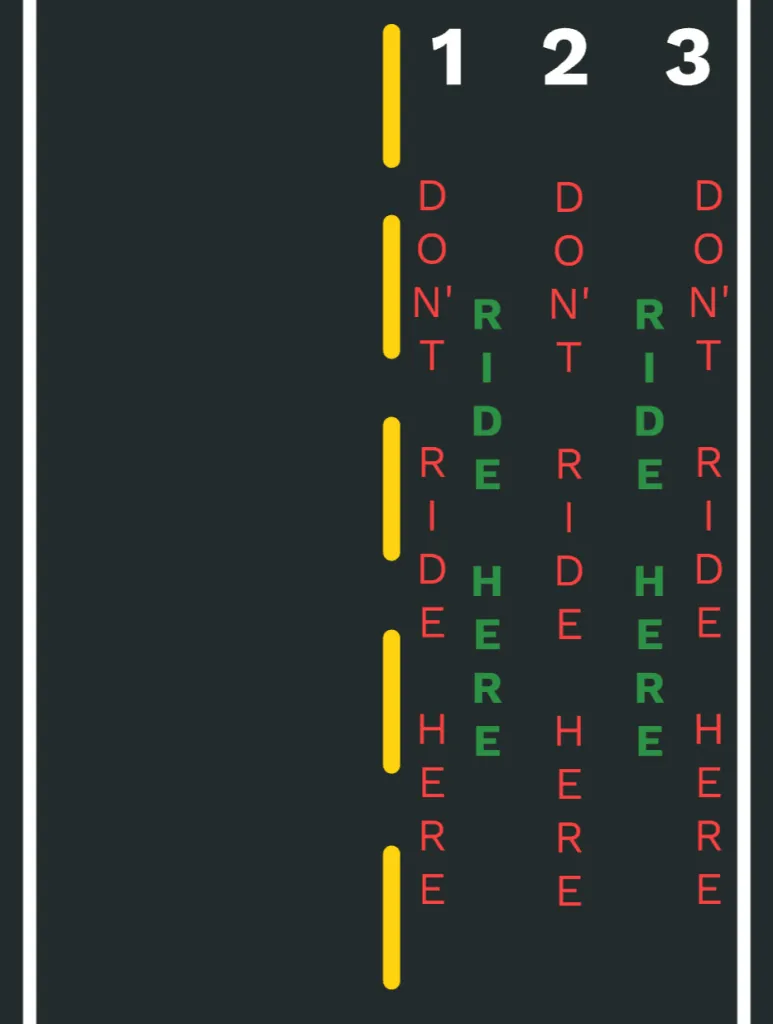
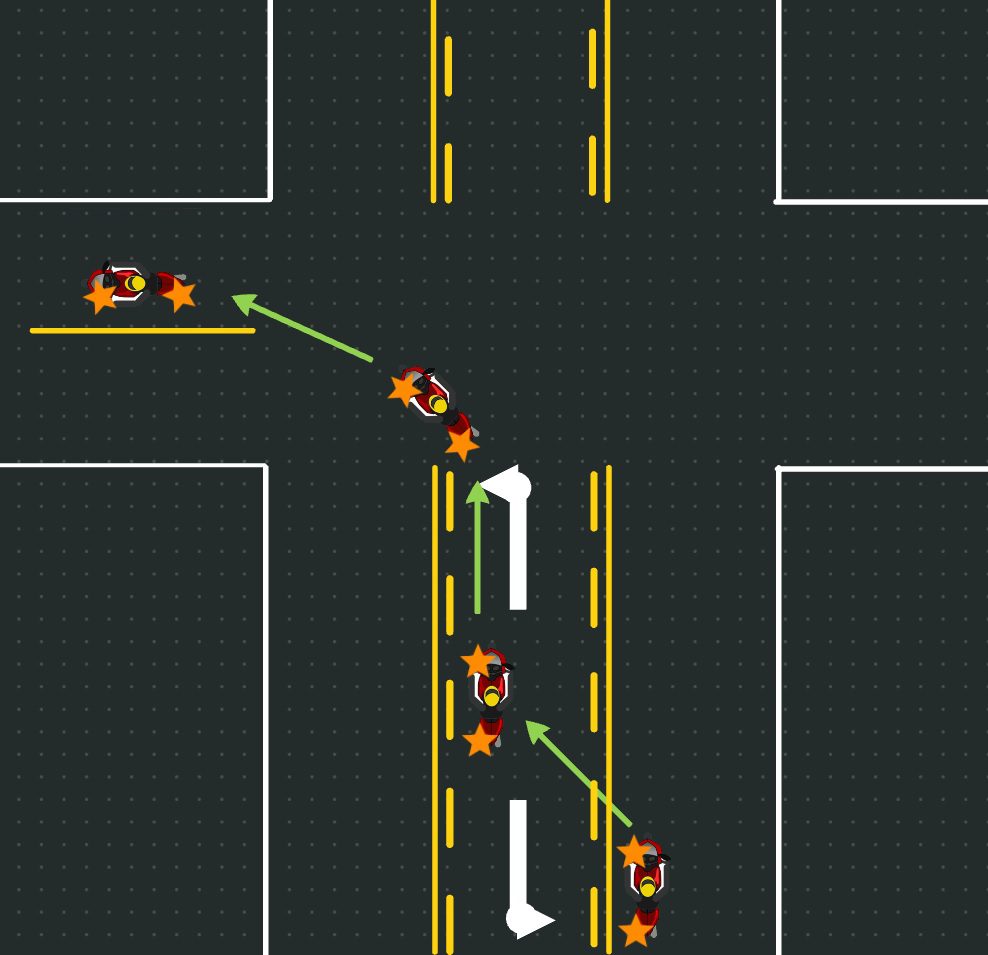
When turning left or right, there are rules. Scan the intersection. Move your head left and right. Mirror checks do not count.
When turning left be in the left part of the lane (lane position 1). No shoulder check required but scan (move your head left and right) the intersection before going.
When turning right be in the right part of the lane (lane position 3). Do a deep right check over your shoulder. Check for cyclists. You must make this check BEFORE you start turning. Scan (move your head left and right) the intersection and go.
If you are waiting at a red light or a stop sign for longer than 5 seconds. Redo your scan (move your head left and right) before going.
5.
Deep right shoulder checks are required for all right turns.
The examiner needs to see the rider look over their right shoulder at all right turns. Deep right shoulder check from a stop. Deep right shoulder check while making a right turn without stopping.
They always want you to check for cyclists, stand up scooter riders, electric unicycle riders, etc. Do this check before you turn, every single right turn you make.
6.
Shoulder check every lane position (position 1 to 3 or 3 to 1) and Shoulder check every lane change.
This means you have to do two to three shoulder checks every time you change lanes. Mirror checks do not count.
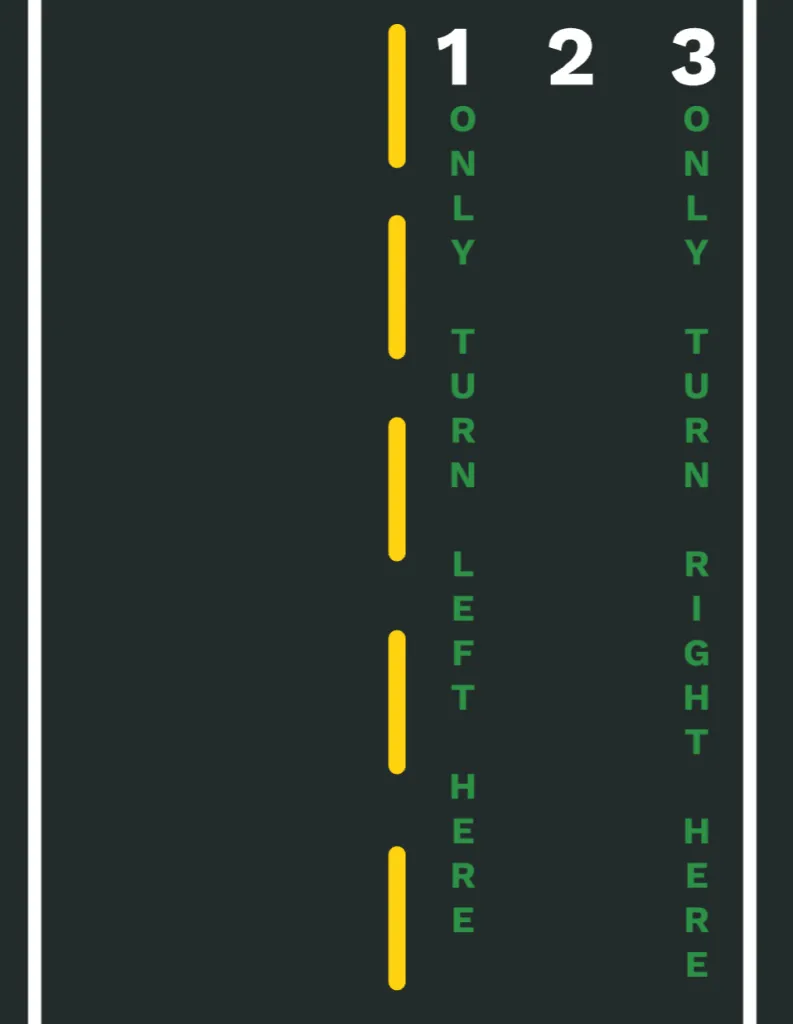
Lane position 2 (the middle of the lane) does not exist on the road test. Do not ride here.
7.
When coming to a stop at a stop sign or a red light. Stop BEFORE the white stop line. Never stop on it or over it. You will get a point or they might fail you for crossing it.
If you cannot see if it is safe to go, you can roll forward until you can. Just make sure to stop before the white line first. Redo shoulder checks and go.
You must have the front or rear brake applied while waiting. The examiner must see your tail light illuminated while you wait.
8.
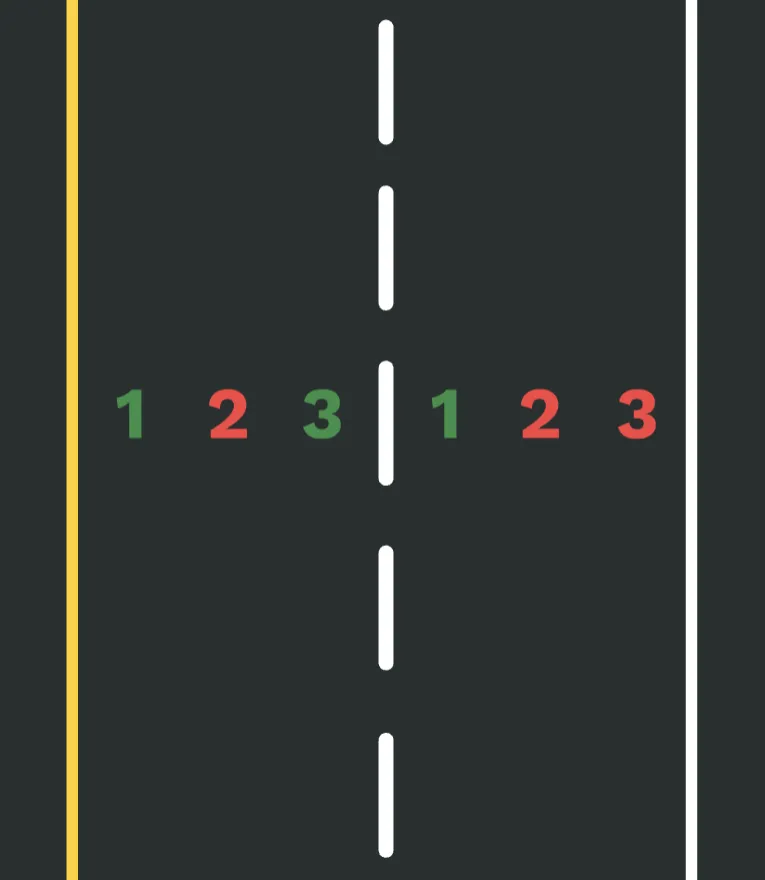
Stay in the lane position 1 (left side). Use lane position 3 (right side) occasionally as necessary. Riding in lane position 3 (right side) is ok on a multi lane road or highway. Do not use lane position 3 (right side) if you against the side walk or a barrier.
Visibly scan left and right before going through intersections and railway crossings. Including when you are stopped at an intersection and light changes from red to green.
The examiner must see your helmet move! Be dramatic about it.
9.
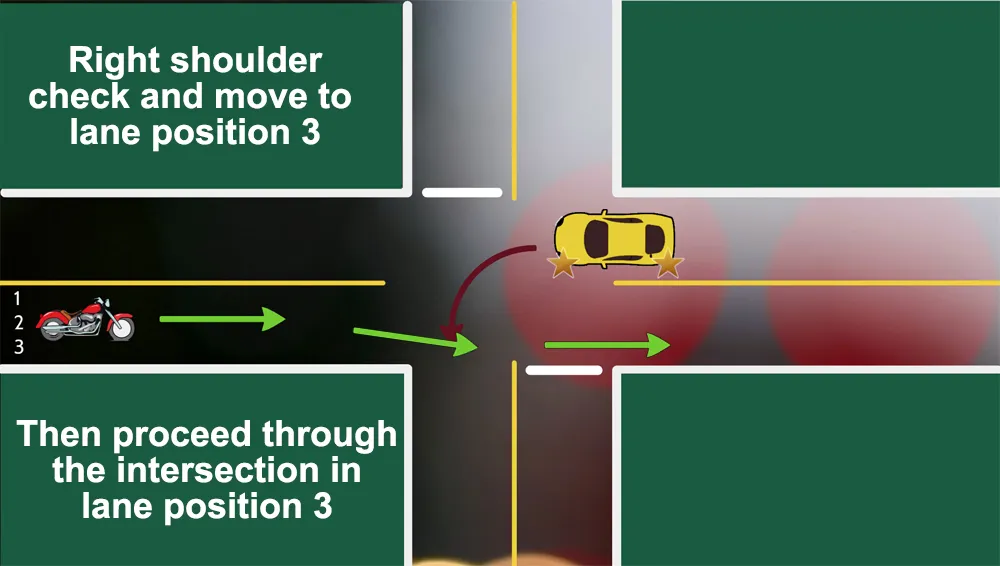
When going straight through an intersection and an oncoming vehicle is waiting to turn left (in front of you, after you or right through you!). Always shoulder check, and move to the right lane position 3. This move could save your life or prevent serious injury. This is just a point on the test but a big reason why so many riders get hurt.
10.
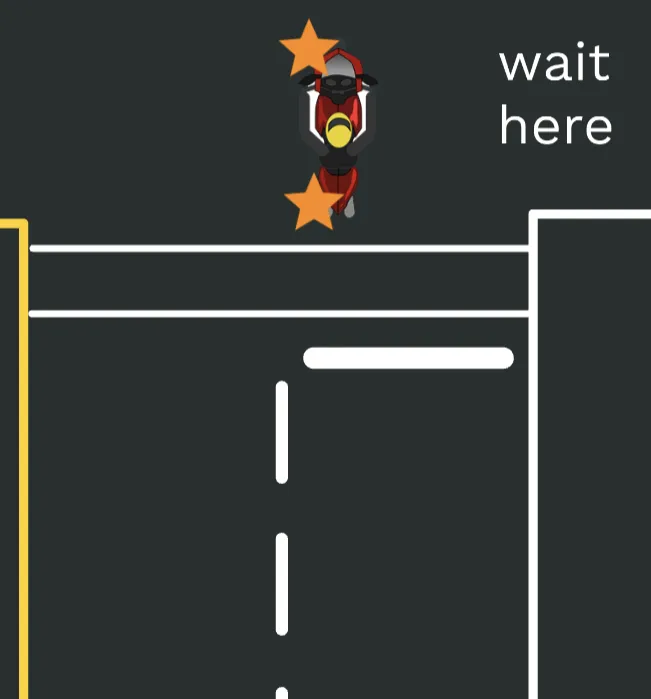
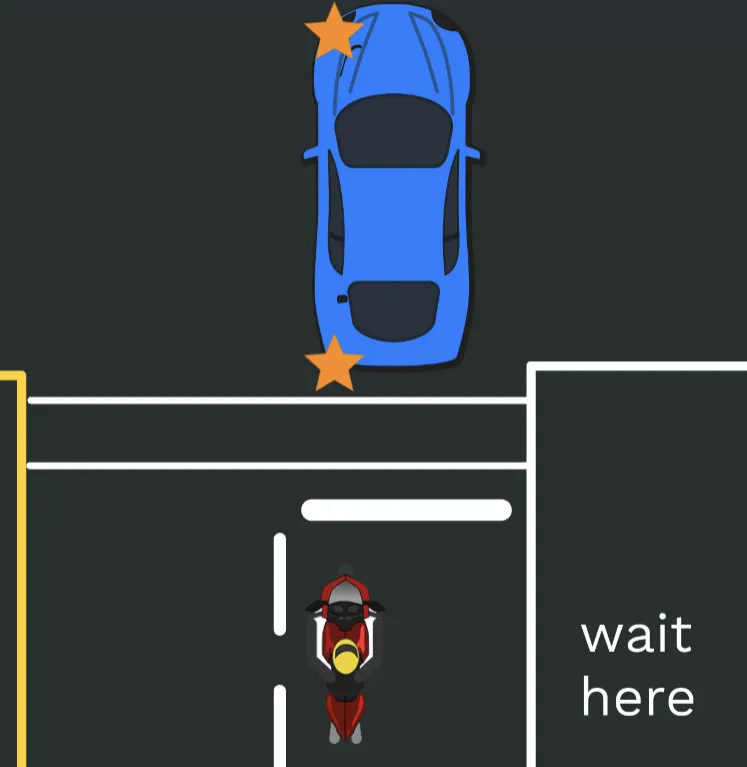
When you are waiting to turn left at an intersection. Only one vehicle at a time. If there is a car ahead of you waiting to turn left. You must wait before the white line. When it is your turn. Position your motorcycle just after the crosswalk. Your back tire should just pass the crosswalk lines. Wait there and keep your wheel straight. Do not go too far out into the intersection.
11.
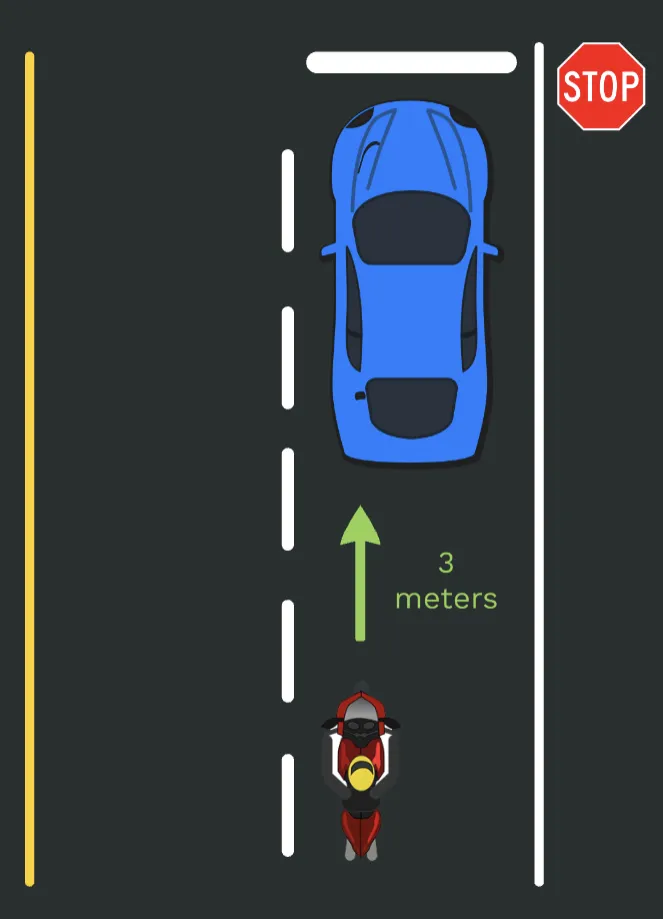
Stop 3 meters, 10 feet, or one car length before all vehicles. Do not stop right behind them. Do not follow too closely to moving traffic as well. At least two seconds of follow distance.
12.
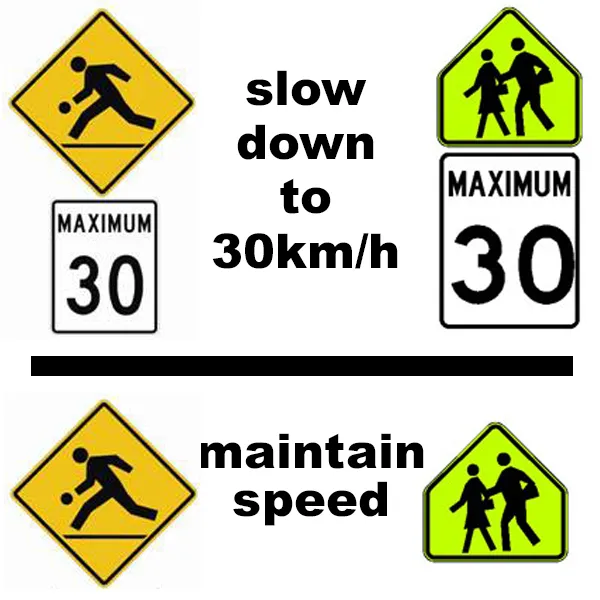
You might have to ride through 4+ school and playground zones. Always check for the signs. If the school zone or playground zone signs have a white speed sign underneath them, you must go 30kmh. Big fields and schools are giveaways too. School zones and Playground zones end when you can see the backside of the sign in the oncoming lane. Do not slow down to School Zone/Playground Zone speed if there is NO white sign present.
It is an instant fail if you speed through a school/playground zone.
In July and August there is no school in session so DO NOT slow down for school zones UNLESS there is sign that says SUMMER SCHOOL IN SESSION (or similar). Then you will have to slow down.
Playground zones are still in effect. Sunrise to Sunset, 365 days a year.
13.
When riding on quiet residential roads with no center line. Riding at 40km/h is ok. Any slower and you may get points against you.
14.

Be careful making a right turn at a red light. Check for the sign, No Right Turn on Red. If it is present, wait. If it is not you may turn on a red light but you must come to a complete stop before the white line. Do not trust traffic, only proceed when it is clear. If there are two lanes, wait until both lanes are clear before going. Never trust traffic. They may make late or abrupt lane changes while you are turning right.
15.
When performing a Uturn, shoulder check every move and use your signals. Shoulder check and right signal to the right to pull over (stopping not required). Shoulder check and left signal to perform the uturn. Pull to the other side of the curb, shoulder check and signal left to re-enter the road. Be sure there are no moving vehicles around. Set yourself up for success, pull over where this is the most amount of space to do your uturn.
Do not do a Uturn between parked cars. Pick a clear space.
16.
They may ask you to pull over and name hazards nearby. They expect you to park on the street, with your back tire against the curb, at a 45 degree angle. You will then name hazards like a blind corner, driveways, debris, etc.
17.
You have four seconds to cancel your signals after you have finished changing lanes, or making a left or right turn.
18.
For all road construction that includes orange cones and orange flashing lights. Ride at 40kmh.
If flaggers (People with STOP and SLOW sign) are present, go 30km/h.
19.
When going up a hill that you cannot see over, shoulder check and move over to the right portion of your lane (position 3).
20.
If there is a center lane present. This lane is for traffic making left. Shoulder check and signal. Enter the center lane. Shoulder check again if needed to make your left turn.
Do not make a left turn through the center lane. You must enter it and ride straight for a short period of time, then make your left turn.
This is about the only time you can cross a solid line on a road test.
21.
Be sure to stop for all pedestrians at Crosswalks. If there are pedestrians nearby, slow down and anticipate it. ICBC can be quick to fail you if they feel you should have stopped for the pedestrian to cross.
Never stop on the road to let a pedestrian cross if there is NO crosswalk. That will be a fail.
If you are at an intersection crosswalk, you may process if the pedestrian is 10 meters away or one lane width away from you.
22.
If there is a vehicle with ORANGE flashing lights stopped on the side of the road slow down to 40km/h, this could be a city landscaping vehicle or something similar.
If you see a police/fire/ambulance with flashing lights stopped, you must also slow down to 40km/h. If you are on a highway, 20km/h under the limit.
23.
When merging onto a highway, speed up, match the speed of traffic and blend in. Merge fast and late. Not early and slow. Do not force traffic to slow down to make room for you. They can fail you for this.
When exiting a highway DO NOT slow down to the speed displayed on the YELLOW posted sign. This is an advisory and recommendation. If traffic is backing up behind you because you are going too slow on the off ramp, you will be marked. Go with the flow of the traffic. Don’t be the slowest, don’t be the fastest in this situation.
24.
Do NOT cross a White Solid Line. These appear at intersections, bus lanes, HOV lanes, and bike lanes. ALWAYS make sure you are not crossing a white solid line when changing lanes. This should not be a fail on the test unless it caused a dangerous action. If you fail for crossing a white solid line. Get as many details as possible and and ask for clarity from the ICBC examiner and/or supervisor.
25.
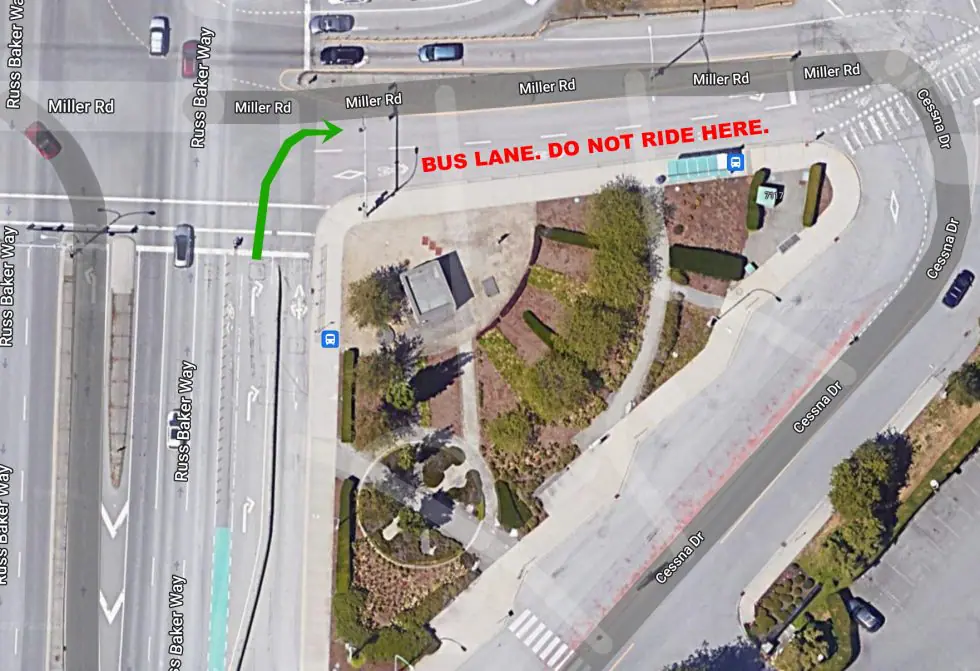
Do not ride in the Diamond Lane (bus lane, HOV lane). This is an automatic fail on the road test. Be careful as some Diamond Lanes are immediate at a right turn.
Richmond Road Test Riders! BE CAREFUL HERE. This will be an instant FAIL.
26.
At the end of your test. They’ll ask you to park. Come to a complete stop, check both sides via shoulder check. Turn on a signal, and back the motorcycle up. If you are unable to back your motorcycle up, you can dismount and do this.
27.
The biggest and most challenging variable of the ICBC road test is the examiner. If you fail and you feel it is unfair, take as many details as possible (including the examiners name), and ask nicely to talk to the Driver Examiner Supervisor. They will not be able to reverse your fail but it will alert them to potential inconsistencies with examiners. They may rebook you an earlier retest.
Watch these videos to prepare for your road test
Still have questions?
The best time to visit us is between 10am and 4pm, Saturday and Sunday. Outside these times, please call or email. We do not run an office.
Richmond Training Lot
7111 No 8 Rd. Richmond.
Coquitlam Training Lot
1401 Lucille Starr Dr. Coquitlam.
Vancouver Training Lot
1875 Boundary Rd, Vancouver.
Learn to Ride with ICBC-Approved Training in Vancouver, Langley, Richmond, New Westminster, Burnaby & Coquitlam
Ready to hit the road on two wheels? At 1st Gear Motorcycle School in BC, we provide professional motorcycle training to help you gain the skills and confidence needed to pass your ICBC licensing (MST), your road test and to ride safely. Our Flexible Schedules allow you to choose between Evening + Saturday & Sunday and Evening + Thursday & Friday classes.
Whether you’re a beginner or looking for a refresher course, we’ve got you covered!
Why Choose 1st Gear Motorcycle School?
-
ICBC-Approved Training – Learn from experienced, certified instructors.
-
Multiple Locations – Motorcycle lessons available in Vancouver, Richmond, New Westminster and Coquitlam.
-
Beginner-Friendly Courses – No prior riding experience needed.
-
Motorcycle & Gear Provided – No bike? No problem! We supply everything.
-
Flexible Scheduling – Evening (Wednesday or Thursday) and Weekend classes available. Choose between Evening + Saturday & Sunday and Evening + Thursday & Friday schedules.
What You’ll Learn in Our Motorcycle Training Courses
✔️ Essential motorcycle controls & handling techniques
✔️ Defensive riding & road safety skills
✔️ ICBC skills test preparation
✔️ On-road training with certified instructors
✔️ Emergency braking & maneuvering techniques
🚀 Our goal is to help you ride with confidence and pass your ICBC road test on the first try!
Sign Up Now & Start Your Motorcycle Journey!
📍 Locations: Vancouver | Richmond | New Westminster | Coquitlam | Langley | Burnaby
📞 Call Us: (778) 714-4327
📧 Email: info@1stgear.ca
➡️ Register Now for a Saturday & Sunday or Thursday & Friday schedule – Don’t wait, spots fill up fast!
Join hundreds of happy riders who trained with 1st Gear Motorcycle School and start your adventure today!